Your baby’s passport photo must be a 2×2 inch color image with a head measuring 1 to 1.4 inches, shot against a plain white background with no shadows, filters, or edits. For a newborn, the fastest reliable path is a home photo using a draped car seat or a flat white sheet. If travel is close and you cannot risk a rejected photo, contact Fast Passport Center for a pre check before you submit anything.
TL;DR:
- A DIY newborn passport photo can be successful using natural light, a plain white sheet, and burst mode on a rear camera, with most applications passing on technical accuracy.
- The head measurement must be between 1 and 1.4 inches from chin to crown, which is the most common error leading to photo rejection.
- Rejections mainly occur due to visible support hands, shadows, background imperfections, or digital edits, all of which are easily fixable with proper setup.
- Professional pre-check services like Fast Passport Center can prevent delays by reviewing photos and paperwork before submission, especially for tight travel schedules.
- For urgent travel, in-person visits to regional agencies or courier services are the best options to avoid processing delays caused by photo-related issues.
Table of Contents
- What Are the Passport Photo Requirements for Babies?
- How Do You Take a Newborn’s Passport Photo at Home?
- Why Do Newborn Passport Photos Get Rejected?
- Where Can You Get a Newborn Passport Photo Taken or Printed?
- When Should You Use a Passport Expediting Service Instead of Waiting?
- Fast Passport Center’s Take on Newborn Passport Photos
- The Photo Rules Are Stricter Than You Think, and More Forgiving Than You Fear
- Get Your Newborn’s Passport Photo and Paperwork Checked Before You Travel
- Sources
- FAQ
What Are the Passport Photo Requirements for Babies?
The State Department applies the exact same biometric standard to a five-day-old infant as it does to an adult applicant. There’s no separate “baby size” or simplified format. That surprises a lot of new parents, and it’s the single biggest source of confusion in this process.
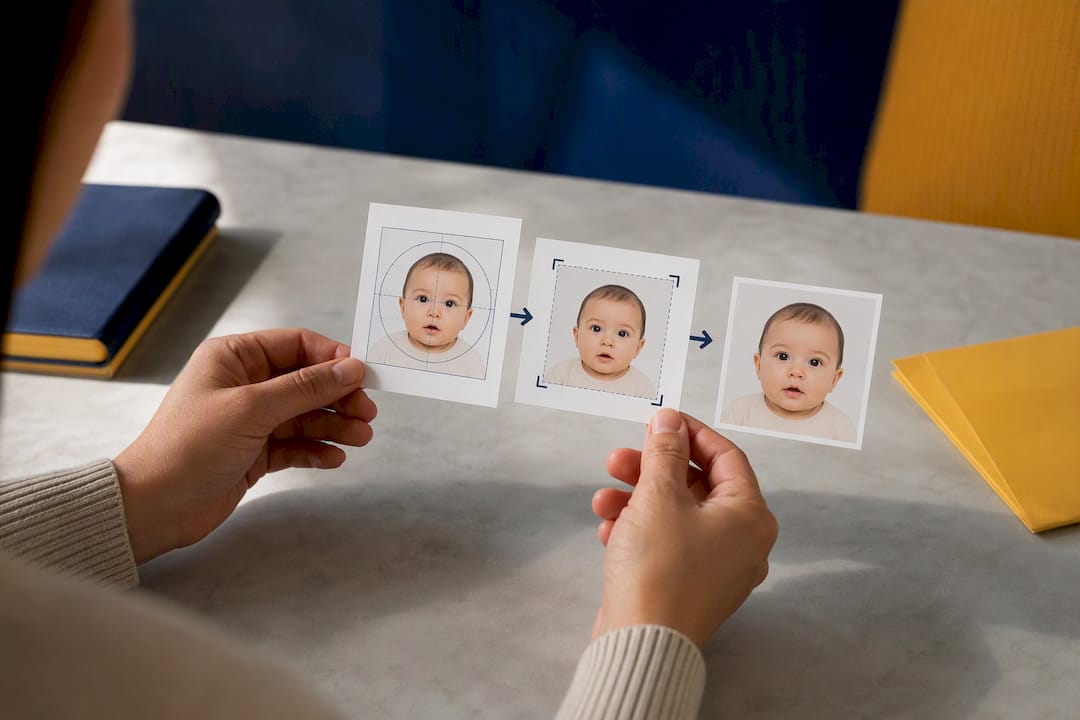
The photo must measure 2×2 inches (51×51 mm), and your baby’s head, measured from chin to crown, must fall between 1 and 1.4 inches (25 to 35 mm). That head measurement is the number most home photos miss. Get the crop too tight or too loose and the application stalls before it even reaches an adjudicator.
Beyond size, the official passport photo specifications require:
- A color photo taken within the last six months.
- A plain white or off-white background with no visible shadows, patterns, or texture.
- No filters, no digital retouching, no Portrait mode blur, and no beauty smoothing of any kind.
- No hats, no pacifiers in the mouth, and no visible hands, arms, or any part of another person in the frame.
- A full front view of the face, taken squarely, not at an angle.
Newborns can get a passport starting just days after birth and the same specs apply from day one, but the State Department builds in real flexibility for how those specs get met.
Here’s the part most parents don’t realize: the government knows you cannot ask a two week old to look at a camera with both eyes open and a neutral expression. So the rules explicitly allow for partial eye openness or a relaxed, non neutral expression for infants under 12 months, as long as you made a genuine attempt to capture the baby with open eyes. A slightly droopy eyelid or a scrunched-up face from mid cry generally will not sink your application. A shadow across the background or a visible car seat strap will.
That distinction, strict on background and framing, forgiving on baby expression, is the one thing to internalize before you pick up your phone to take the shot.
How Do You Take a Newborn’s Passport Photo at Home?
Two methods work reliably for infant passport photos, and both avoid the single hardest problem in this whole process: getting a floppy, unpredictable newborn to hold still against a clean white background without your hands showing up in the shot.
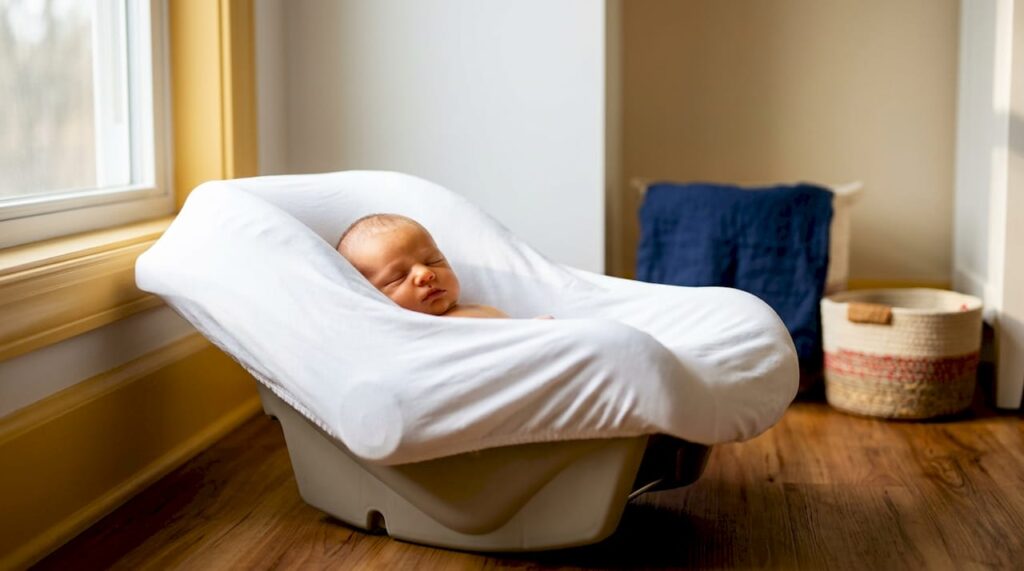
Method A: The draped car seat. Buckle your baby into a rear-facing car seat, then drape a plain white or off-white bedsheet over the entire seat, straps, buckles, and all. Pull the fabric taut enough that no strap outline or shadow shows through. Position the seat near a window for indirect natural light, never direct sun, which creates harsh shadows on a baby’s face. Stand or kneel so your camera is level with your baby’s face, not shooting up their nose or down at an angle.
Method B: The overhead flat lay. Lay a smooth, wrinkle-free white sheet on the floor or a bed, place your baby on their back, and support their neck gently with a rolled towel tucked just outside where the photo will be cropped. Stand directly above and shoot straight down. This method tends to produce the cleanest results because gravity keeps the baby’s face relatively still and centered, and it’s the approach parenting guides most often recommend for infants who can’t yet hold their head up on their own.
Whichever method you use, the camera settings matter as much as the setup:
- Use your phone’s rear camera, never the front-facing one; it produces sharper, less distorted images.
- Turn off Portrait mode, beauty filters, and any automatic smoothing. The State Department’s software can flag edited images, and manual review catches the rest.
- Shoot in burst mode. A newborn’s face changes shape ten times a second, so thirty or more frames from a two second burst gives you far better odds of one clean, usable shot.
- Skip the flash. It washes out skin tone and creates a red-eye risk. Natural window light is softer and more forgiving.
- Frame wide at first, then crop tighter later using the State Department’s photo tool, which lets you size the image precisely to the 1 to 1.4 inch head rule before you print or upload anything.
Timing changes your success rate more than any camera trick. Aim for a window 20 to 60 minutes after a feeding and after a nap, when most babies are calm, alert, and not actively screaming or fighting sleep. Have a partner or helper stand just behind or beside you, out of frame, holding a quiet toy or making a soft sound to draw the baby’s eyes toward the lens without touching them.
Pro Tip: Take far more photos than you think you need. Out of a thirty-shot burst, you might get three usable frames and only one that nails both the head size and a genuine open-eye attempt. Newborn sessions are a numbers game, not a one-shot art form.
Why Do Newborn Passport Photos Get Rejected?
Most rejected infant photos fail for one of five predictable reasons, and nearly all of them are fixable once you know what to look for before you submit.
- A hand, finger, or arm in frame. Whoever is holding or supporting the baby leaves a thumb, sleeve, or car seat buckle visible at the edge of the shot. Crop tighter, or reposition your support so it sits fully outside the final frame.
- A background that isn’t truly plain white. Wrinkled sheets cast shadows that read as gray patches; patterned fabric or a colored wall behind the sheet shows through translucent material.
- Visible shadows on the face or backdrop. Direct overhead lighting or a single lamp creates dark patches under the chin or around the ears. Indirect daylight from a window nearly always looks cleaner.
- Filters or digital editing. Any smoothing, color correction, or automatic “enhance” feature applied by your phone’s camera app can trigger a rejection on review.
- Incorrect head size. A head measuring less than 1 inch or more than 1.4 inches from chin to crown gets flagged even if every other element of the photo is perfect.
Partially closed eyes are not automatically a problem. Practical concessions exist specifically for infants under 12 months, so a photo where your baby’s eyes are half open, provided you can show you tried for an open-eye shot, generally passes review. A fully closed-eye shot where the baby is asleep, or a photo where the face is turned in profile, is the kind that typically needs a retake.
Before you print or upload anything, run the image through the official crop and validation tool. It checks the head measurement automatically and shows you exactly how the photo will appear once trimmed to 2×2 inches, which catches sizing problems no amount of eyeballing will.
Where Can You Get a Newborn Passport Photo Taken or Printed?
You don’t have to do this yourself. If a car seat photo shoot with a screaming infant sounds like more stress than it’s worth, several print and service options exist across the country.
Pharmacy and retail counters. CVS, Walgreens, and similar chains offer passport photo services at their photo counters, typically priced in the $15 to $17 range per set. Staff there photograph adults all day but often have less practice with newborns, so expect more retakes and be prepared to bring your own white sheet if their in-store backdrop isn’t a true match for a squirming infant.
USPS and other acceptance facility counters. Some post offices and application acceptance facilities offer photo services alongside passport form processing, which can be convenient if you’re handling the DS-11 form and photo in one stop.
Digital apps and home-print services. Free or low-cost apps can crop and format a photo you took at home to the required 2×2 dimensions. Be cautious with any app that auto applies filters or background replacement. The State Department’s own guidance is strict about unedited images, so stick to cropping tools, not beautifying ones. Home capture plus a validated crop tool plus pharmacy printing often runs under $5 total and produces more consistent results than repeated in-store attempts.
What to bring if you use a counter service: the completed DS-11 form if you’re applying for the first time, proof of your baby’s citizenship (typically a certified birth certificate), valid parent or guardian identification, and both parents’ presence or notarized consent, since a minor’s passport application generally requires consent from both parents or legal guardians. If only one parent is available, check the specific consent requirements before your appointment, since missing consent paperwork causes delays just as often as a bad photo does.
When Should You Use a Passport Expediting Service Instead of Waiting?
Your travel date, more than anything else, should decide how you get this passport processed.
If you’re flying within the next three days, or you’re facing a genuine family emergency, your only realistic option is an in-person visit to a Regional Passport Agency, and you’ll need an appointment. If your trip is two days to four weeks out, a courier and expediting service is generally the better route, especially if you don’t live near one of the roughly two dozen regional agencies nationwide. If you have four weeks or more before departure, standard processing through your local USPS acceptance facility is usually sufficient.
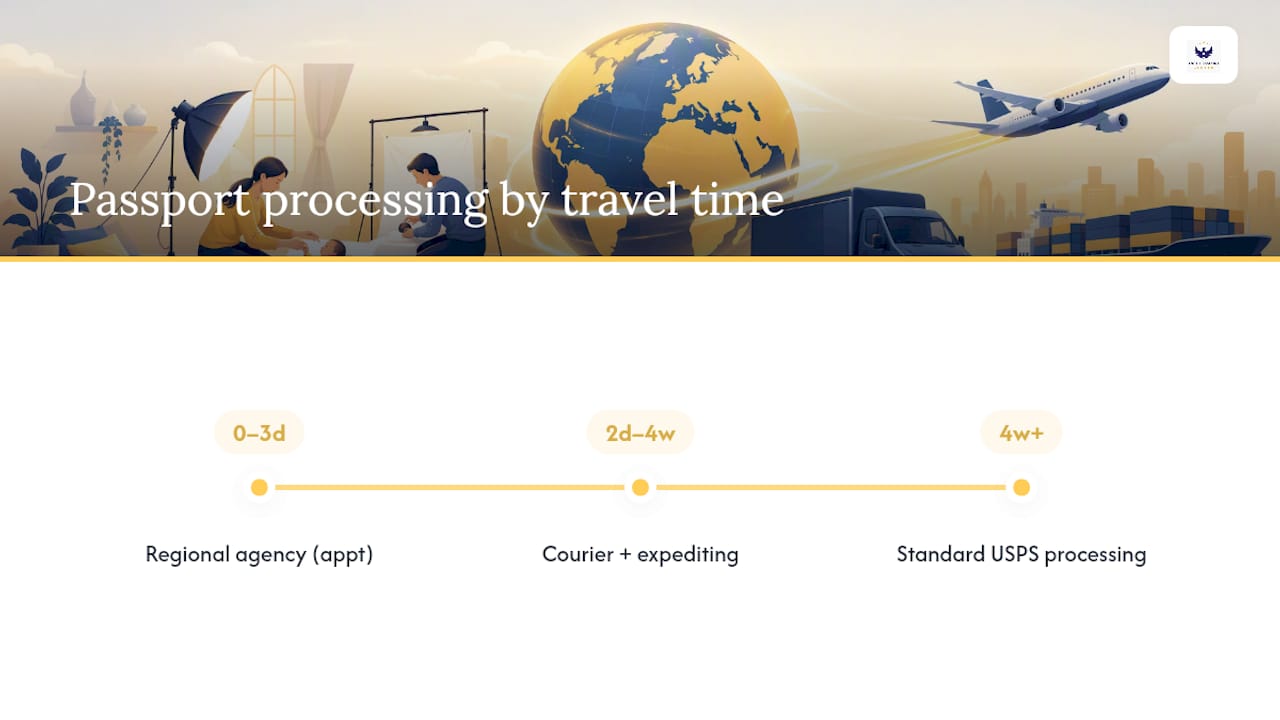
That timeline matters even more once you factor in photo rejections, which remain the single most common reason applications get held up. A held application means resubmitting a corrected photo by mail and waiting again, and for a family already tight on time before a trip, that delay can mean missing the flight entirely.
If you live two or more hours from your nearest regional agency, cities like Tampa, Charlotte, Sacramento, Nashville, or Louisville all fit that description, a courier service that pre-checks your baby’s photo and documents before hand-delivering them removes most of that risk. It catches a bad crop or a shadowed background before it ever reaches an examiner, rather than after.
Fast Passport Center’s Take on Newborn Passport Photos
Fast Passport Center has operated as a U.S. Department of State registered courier for more than 20 years, with an A+ Better Business Bureau rating and drop-off offices in 24 cities across the country. That matters here because the pre-check process, having an experienced set of eyes review your baby’s photo and paperwork before it goes anywhere near an agency, catches the exact mistakes new parents make most often: a strap peeking through a sheet, a head measurement half a millimeter outside the range, a shadow nobody noticed on a phone screen.
Consider a family in Charlotte booking international travel for three weeks out, with the nearest regional agency two hours away. Attempting a walk-in appointment burns a travel day they don’t have. A DIY photo that gets rejected by mail costs a week or more in resubmission time. A courier pre-check catches the photo problem in advance and hand delivers the corrected application, cutting out the mail queue entirely.
The Photo Rules Are Stricter Than You Think, and More Forgiving Than You Fear
Most guidance on this topic either over-corrects toward panic, “your baby’s passport photo will get rejected if you don’t hire a professional,” or under-corrects toward complacency, “just snap a quick pic and you’ll be fine.” Neither is accurate. The rules are genuinely strict on background, shadow, and editing, and genuinely lenient on the things new parents worry about most: a fussy expression, half-open eyes, a slightly off-center gaze.
What the research actually supports is this: a careful DIY photo, taken with a plain white sheet, natural light, and a burst-mode camera, passes review the overwhelming majority of the time. The failures come from avoidable technical errors, not from having a newborn who won’t cooperate.
Where I’d push back on conventional advice is the instinct to treat professional help as a last resort for people who “failed” at the DIY method. For a family already juggling a newborn and a tight travel window, a pre-check isn’t an admission of defeat. It’s the same logic as proofreading a document before you submit it, except the stakes are a missed flight instead of a typo.
— Andy Irons
Get Your Newborn’s Passport Photo and Paperwork Checked Before You Travel
Fast Passport Center is the practical alternative to gambling on a DIY photo when your trip is two days to four weeks away. Instead of mailing your application and hoping the crop, background, and head size all pass review the first time, our team reviews your baby’s photo and documents before anything gets hand delivered to the agency.
This service fits parents anywhere in the country, but it matters most if you’re two or more hours from a regional passport agency, in cities like Tampa, Nashville, or Sacramento, where a rejected photo means losing days you don’t have. As a State Department registered courier with drop-off offices in 24 cities, we cut out the mail queue and the guesswork. If your newborn’s trip is coming up fast, check availability and request a photo and document pre check before you submit anything on your own.
Sources
- Passport Photos – Travel – State Department
- State Department photo tool
- How to take your baby’s first passport photo | The Points Guy
Before your first outing with your newborn to run errands or take photos outside the house, a little routine planning around feeding and nap timing makes the whole session go smoother.
FAQ
How Do You Get a Passport Photo for a Newborn?
Drape a plain white sheet over a car seat or lay your baby flat on a white sheet, shoot with your phone’s rear camera in burst mode using natural light, then crop the image to 2×2 inches with the head measuring 1 to 1.4 inches using the State Department’s photo tool.
How Soon Can a Newborn Get a U.S. Passport?
A newborn is eligible to apply for a passport just days after birth, and the same 2×2 inch photo specifications apply from day one, with practical allowances for infant expression and eye openness.
What Are the Passport Photo Requirements for a Baby?
The photo must be 2×2 inches, in color, taken within the last six months, against a plain white or off-white background with no shadows, filters, or edits, and the baby’s head must measure 1 to 1.4 inches from chin to crown.
Where Can You Take Newborn Passport Photos?
You can take one at home using a draped car seat or a flat white sheet, or get one printed at pharmacy counters like CVS or Walgreens; if your trip is two days to four weeks away, Fast Passport Center can pre-check your photo before it’s submitted.