A passport application can be complete, signed, and ready to go, yet still lose valuable time because of one small issue: the photo. These best passport photo requirement tips help U.S. travelers avoid the image errors that can trigger a request for a new photo and put urgent travel plans at risk.
A passport photo is not a casual headshot. It is a government identity document image with specific rules for size, lighting, expression, background, and appearance. When travel is close, getting it right the first time is one of the simplest ways to protect your processing timeline.
Start With the Current U.S. Passport Photo Rules
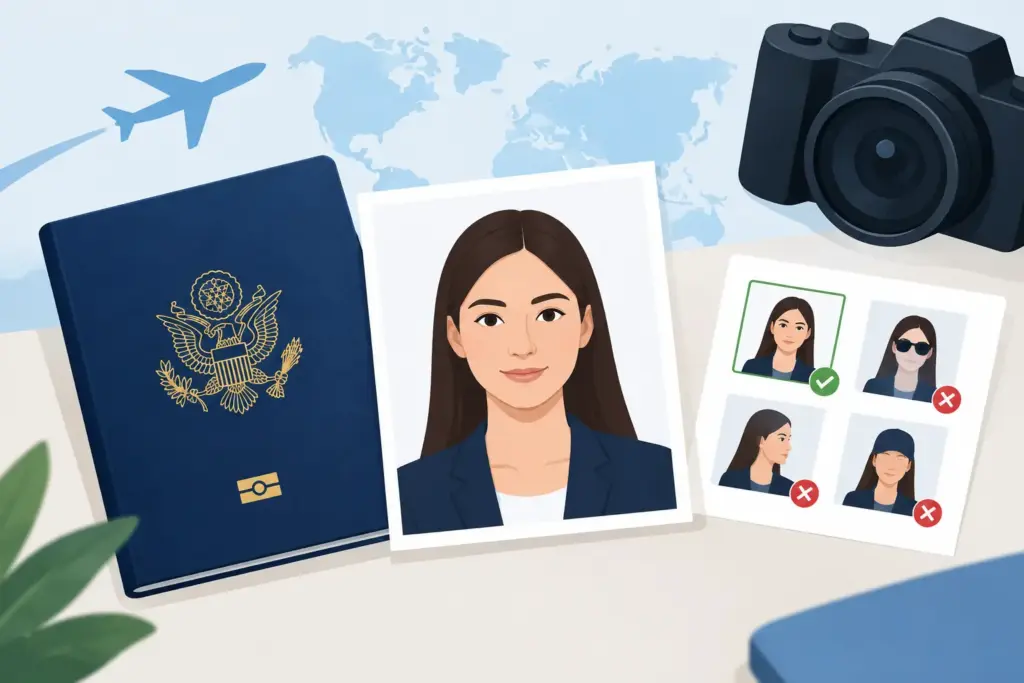
Your photo must be in color, taken within the last six months, and printed on quality photo paper. It must measure 2 by 2 inches. The image should be clear, properly focused, and free of pixels, blur, damage, or visible alterations.
Use a plain white or off-white background. Stand or sit facing the camera directly, with your full face visible and both eyes open. A neutral expression is acceptable, as is a natural smile, but avoid exaggerated expressions, tilted heads, or looking away from the lens.
The most technical measurement is head size. Your head, measured from the bottom of your chin to the top of your hair, should be between 1 inch and 1 3/8 inches in the finished 2-by-2-inch photo. Many professional passport photo providers crop the image automatically, but it is still worth checking before you submit it.
Make Sure the Photo Actually Looks Like You Now
The six-month rule matters more than many applicants realize. A photo from a recent wedding, work event, or prior ID may look perfectly professional but still be too old. Use a current image, especially if you have changed your hairstyle significantly, grown or removed facial hair, changed your appearance after medical treatment, or are applying for a child.
For children and babies, the same general standards apply: the child should face the camera with their face visible and eyes open when possible. An infant can lie on a plain white sheet if that is the safest practical option. No other person, including a supporting hand, should appear in the frame.
Best Passport Photo Requirement Tips for Appearance
What you wear can make the difference between a photo that passes immediately and one that needs to be replaced. Choose ordinary, everyday clothing that contrasts with a light background. A darker shirt often works well because it clearly separates your shoulders from the white or off-white backdrop.
Do not wear a uniform, camouflage clothing, or anything that appears to be a uniform. Religious clothing worn daily is permitted, but it cannot cover your face or cast shadows. If you wear a head covering for religious or medical reasons, ensure your full face is visible from the bottom of your chin to the top of your forehead and from edge to edge.
Glasses are generally not allowed in U.S. passport photos, even if you wear them every day. The limited exception is for a documented medical need, which requires a signed statement from a medical professional. Sunglasses and tinted lenses are not acceptable.
Avoid headphones, wireless earbuds, and large accessories. Jewelry is usually fine if it does not hide any part of your face or create glare. Hair can be worn naturally, but it should not cover your eyes, obscure your face, or create heavy shadows.
Keep Makeup and Editing Minimal
Everyday makeup is fine. The goal is not to look overly formal or completely makeup-free – it is to look like yourself. Avoid beauty filters, skin smoothing, contouring effects, eye-color changes, or apps that reshape facial features. Digital editing can result in rejection, even when the final image looks polished.
Do not remove blemishes, whiten teeth, adjust the background digitally, or use portrait-mode blur. The passport photo needs to be an accurate, current representation of your appearance. Lighting adjustments made by a professional photo service may be appropriate when they correct exposure without changing your features, but heavy retouching is not worth the risk.
Get the Lighting and Background Right
Poor lighting causes many preventable photo problems. Your face should be evenly lit, with no harsh shadows across the eyes, nose, or jawline. The background must also be plain and evenly lit, without a visible corner, texture, curtain folds, furniture, or objects behind you.
Natural light can work, but direct midday sunlight often creates squinting and strong shadows. If you take the photo at home, use soft, even light from in front of you. A window can help if the light is diffused, but do not stand with the window behind you. Backlighting can leave your face too dark while making the background overly bright.
A professional passport photo location is often the safer choice for travelers with little room for error. If you use a phone or camera at home, do not take a close-up selfie. Have someone else take the photo from a proper distance so your face is not distorted by a wide-angle lens. Then confirm that the final print meets the required 2-by-2-inch dimensions.
Avoid These Common Reasons for Photo Rejection
A photo can look acceptable at a quick glance and still fail a requirement. The most common problems are usually straightforward: an old photo, the wrong dimensions, shadows, an incorrect background, glasses, or a face that is too small or too large in the frame.
Other frequent issues include low-resolution home prints, photos printed on regular paper, red-eye, visible filters, and hair covering part of the face. A photo may also be rejected if it is creased, smudged, cut unevenly, or attached incorrectly to the application.
Be especially careful with photos created for social media or other IDs. A driver’s license photo, professional headshot, or cropped vacation image may not meet passport standards. The U.S. passport photo requirements are more specific than most people expect.
Match Your Photo to Your Application Type
Whether you are applying for a first passport, renewing by mail, replacing a lost or damaged passport, or applying for a child, photo compliance remains essential. Do not assume that a previous passport photo can be reused. Your new application requires a current photo that meets the standards at the time of submission.
If you are renewing by mail, follow the application instructions carefully for attaching the photo. Do not staple through the face. For a first-time passport or a child passport application submitted at an acceptance facility, bring a compliant photo with you unless the facility confirms that photo service is available.
Travelers using expedited service should be even more cautious. Expedited processing can reduce the time spent in the government processing queue, but it does not waive photo requirements. If the photo is unacceptable, the application may need additional attention before it can move forward.
Build a Quick Photo Check Into Your Application Review
Before you send your passport package, take one minute to inspect the photo under good light. Confirm that it is recent, color, square, and printed at 2 by 2 inches. Check that your background is plain white or off-white, your face is centered and fully visible, and you are not wearing glasses or a prohibited head covering.
Also compare the photo to your application details. Your current name, supporting documents, signatures, payment, and photo should all be ready together. A clean, accurate package gives you the best chance of avoiding delays caused by correctable paperwork issues.
For travelers facing a tight departure date, expert document review can provide needed reassurance before materials are submitted. Fast Passport Center helps customers prepare their applications with guided support and a document pre-check, so potential photo and paperwork issues can be identified before they become a travel problem.
Your passport photo may be only two inches square, but it carries real weight in the application process. Take the extra few minutes to verify it now, and you can move toward your trip with one less deadline-sensitive detail to worry about.